Big Data Analytics: How Business Leaders Can Turn Data into Actionable Strategies
In the modern era of rapidly expanding data, the ability to comprehend and analyze text-based information is vital for both businesses and researchers.
One powerful tool to help us navigate this is sentiment analysis. According to IBM, sentiment analysis, or opinion mining, is the process of analyzing large volumes of text to determine whether it expresses a positive sentiment, a negative sentiment, or a neutral sentiment.
This analysis can be invaluable for understanding customer feedback, market trends, or even social media opinions.
In this step-by-step guide, we will explore how to perform sentiment analysis using HuggingFace Transformers within the Microsoft Fabric environment, providing a practical, step-by-step approach to harnessing these advanced technologies.
By the end of this tutorial, you’ll be able to build, train, and deploy your own sentiment analysis model, all while leveraging the immense potential of HuggingFace and Microsoft Fabric. Along the way, we’ll address some of the challenges you might face, including limitations in processing power, and provide tips for overcoming them efficiently.
In this blog, you will find:
⚙️ Setting Up an ML Model in Microsoft Fabric
🛠️ Create an ML Model in Fabric
🚀 Applications of Sentiment Analysis
What is Sentiment Analysis?
Before we get into the technical details, let's first define sentiment analysis.
Definition and Importance
Sentiment analysis is a method used in Natural Language Processing (NLP) to categorize the sentiment expressed in a piece of text—whether it's positive, negative, or neutral. This is usually accomplished using machine learning models that are trained to identify patterns in language and context, enabling them to predict the sentiment of new, unseen text.
By analyzing textual data from various sources such as social media platforms, customer reviews, and feedback forms, sentiment analysis provides meaningful insights into customer opinions and preferences. This enables businesses to tailor their products, services, and marketing strategies to better meet customer needs and expectations. In essence, sentiment analysis transforms raw textual data into actionable intelligence, helping organizations stay ahead in a competitive market.
Setting Up an ML Model in Microsoft Fabric
We’ll start by building a machine learning model within Microsoft Fabric, which integrates seamlessly with HuggingFace Transformers.
Inspiration for this article and many of the details on how to get this working are derived from the amazing Practical Deep Learning for Coders course, HuggingFace’s Getting Started with Sentiment Analysis, and mlflow’s Fine-Tuning Open-Source LLM using QLoRA with MLflow and PEFT. My contributions here are how to get all this working in Fabric.
⚠️ Since Fabric notebooks currently lack GPU (graphics processing unit) support—as of mid-2024—fine-tuning machine learning models can be quite time-consuming. You can either allow the process to run for an extended period in Fabric (which could take several hours or even days), or alternatively, train your model on a GPU-enabled Virtual Machine or Databricks, and later transfer the model back into Fabric for making predictions. Hopefully, Fabric will introduce GPU functionality in the near future.
Here’s a step-by-step breakdown:
Create an ML Model in Fabric
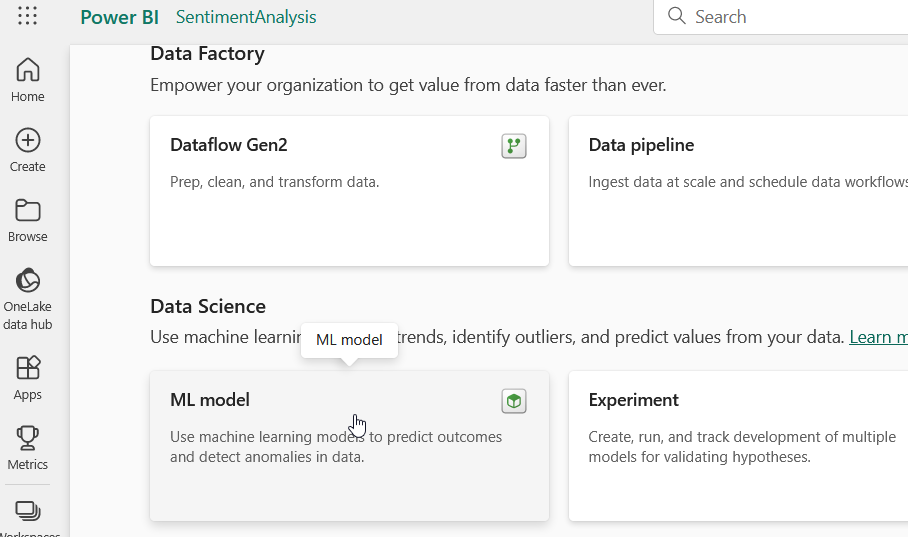
1. Begin by creating a new machine learning model within Microsoft Fabric. Navigate to the Data Science section and name your model (for example, "SentimentAnalysis").

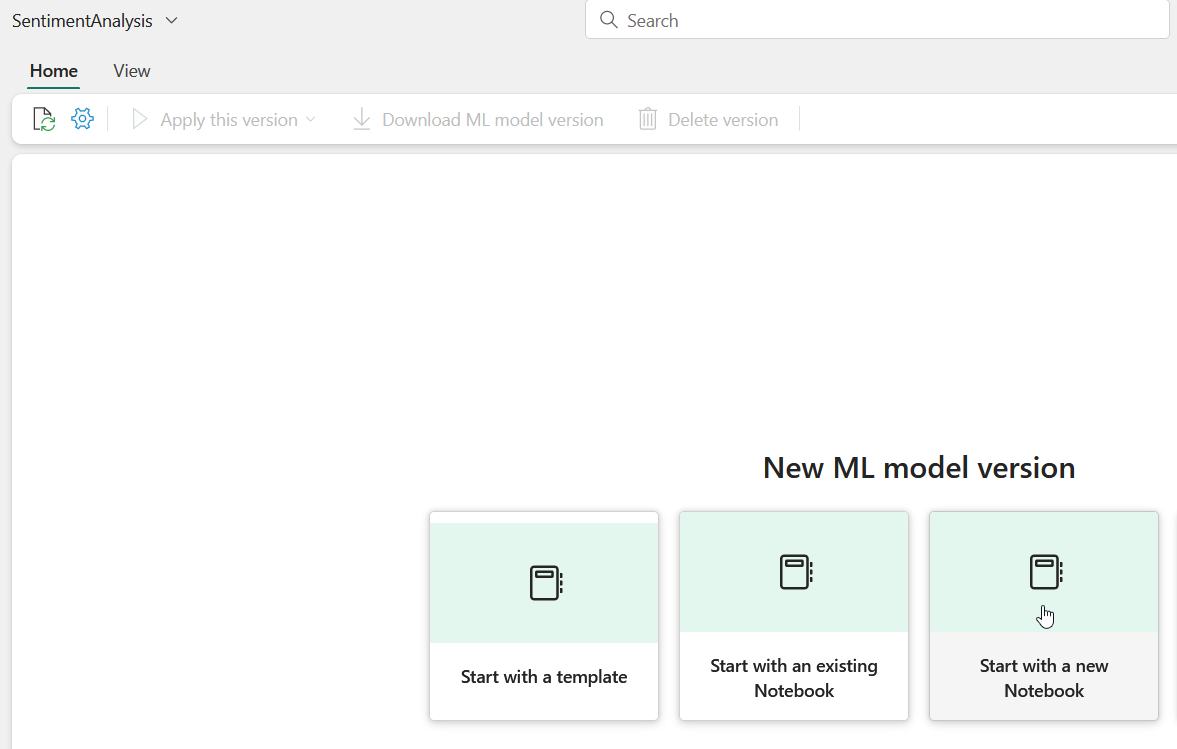
2. Next, click on “Start with a new Notebook” to open a new notebook where we will input the code needed to train and deploy the model.

Train Your Model
The commands below will download the IMDB sentiment analysis dataset, create compact training and testing datasets, train a model, construct a pipeline from that model, and save it using mlflow. Incorporate these into your new Notebook, assigning each section to its own cell in your notebook.
1. Install requirements
%pip install -U -q torch torchvision -f https://download.pytorch.org/whl/torch_stable.html
%pip install -U -q accelerate
%pip install -U -q sentence-transformers
%pip install -U -q sentencepiece
%pip install -U -q datasets
%pip install -U -q evaluate
%pip install -U -q transformers
%pip install -U -q mlflow
2. Download the IMDB dataset and generate compact training and testing datasets.
Observe the range(####) sections; these can be expanded for improved accuracy or reduced for quicker execution as needed. The 3000/300 split in the following cell typically requires approximately 2.5 hours to execute in Fabric.
from datasets import load_dataset

imdb = load_dataset("imdb")
small_train_dataset = imdb["train"].shuffle(seed=42).select([i for i in list(range(3000))])
small_test_dataset = imdb["test"].shuffle(seed=42).select([i for i in list(range(300))])
#print a row of the small training dataset
small_train_dataset[1]
3. Choose the base model you wish to utilize and construct your tokenizer function accordingly.
from transformers import AutoTokenizer

model_nm = 'microsoft/deberta-v3-small'
tokz = AutoTokenizer.from_pretrained(model_nm)
4. Tokenize your training and testing datasets
def tok_func(x): return tokz(x["text"])
train_tok_ds = small_train_dataset.map(tok_func, batched=True)
test_tok_ds = small_test_dataset.map(tok_func, batched=True)
5. As per HuggingFace documentation, the following will “speed up training… use a data_collator to convert your training samples to PyTorch tensors and concatenate them with the correct amount of padding”
from transformers import DataCollatorWithPadding

data_collator = DataCollatorWithPadding(tokenizer=tokz)
6. Prepare the model for training.
from transformers import AutoModelForSequenceClassification

id2label = {0: "negative", 1: "positive"}
label2id = {"negative": 0, "positive": 1}
model = AutoModelForSequenceClassification.from_pretrained(model_nm, num_labels=2, label2id=label2id, id2label=id2label)
7. Define the metrics to be used to evaluate how good our model is after fine-tuning accuracy and f1 score
import numpy as np
import evaluate as ev

load_accuracy = ev.load("accuracy")
load_f1 = ev.load("f1")
def compute_metrics(eval_pred):
   logits, labels = eval_pred
   predictions = np.argmax(logits, axis=-1)
   accuracy = load_accuracy.compute(predictions=predictions, references=labels)["accuracy"]
   f1 = load_f1.compute(predictions=predictions, references=labels)["f1"]
   return {"accuracy": accuracy, "f1": f1}
8. Configure our training arguments. Take note that we’ll be reporting our results and logs to mlflow via the report_to parameter
from transformers import TrainingArguments

bs = 16
epochs = 2
lr = 2e-5
args = TrainingArguments(output_dir='outputs', learning_rate=lr, warmup_ratio=0.1,
    eval_strategy="epoch", per_device_train_batch_size=bs, per_device_eval_batch_size=bs,
    num_train_epochs=epochs, weight_decay=0.01, report_to='mlflow')
9. Run our first pass at training our model
from transformers import Trainer
import mlflow

trainer = Trainer(model, args, train_dataset=train_tok_ds, eval_dataset=test_tok_ds,
              tokenizer=tokz, data_collator=data_collator, compute_metrics=compute_metrics)

with mlflow.start_run() as run:
    trainer.train()
10. Construct a pipeline using our trained model, which will integrate the model and tokenizer, simplifying the process of conducting sentiment analysis with our model.
from transformers import pipeline

tuned_pipeline = pipeline(
    task="text-classification",
    model=trainer.model,
    batch_size=8,
    tokenizer=tokz
)
#run a quick check of our pipeline to ensure it works.
quick_check = "I love this movie"
tuned_pipeline(quick_check)
11. Create a signature defining the inputs and outputs for our integrated model (comprising the model and tokenizer) and record it in MLflow for accessibility in other notebooks.
from mlflow.models import infer_signature
from mlflow.transformers import generate_signature_output

model_config = {"batch_size": 8}

output = generate_signature_output(tuned_pipeline, quick_check)
signature = infer_signature(quick_check, output, params=model_config)

with mlflow.start_run(run_id=run.info.run_id):
    model_info = mlflow.transformers.log_model(
        transformers_model=tuned_pipeline,
        artifact_path="fine_tuned",
        signature=signature,
        input_example="I love this movie!",
        model_config=model_config,
    )

mlflow.end_run()
12. Once you've executed all the preceding cells, the output of the last cell should resemble the following:

13. Additionally, a new Experiment should appear in your workspace (you might need to refresh your browser window):

Save your ML Model
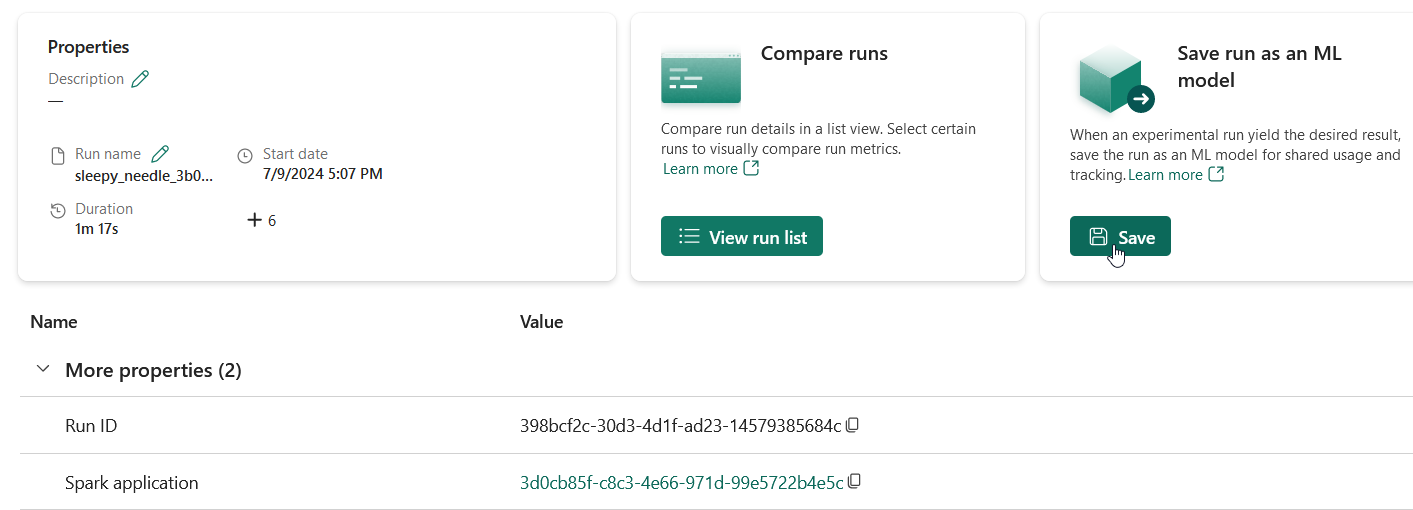
1. Open the newly created experiment in your workspace and click on "Save run as ML model."

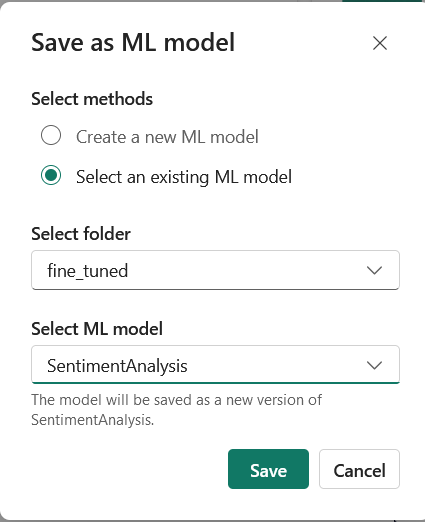
2. Click on “Select an existing ML model”, select the fine_tuned folder, select the model you created and click Save.

Load and Predict
Create a new notebook in your workspace. Then, insert the following code into your notebook.
1. Install required modules
%pip install -U -q transformers
%pip install -U -q mlflow
2. Load the latest version of the SentimentAnalysis ML model
import mlflow

loaded = mlflow.transformers.load_model(model_uri=f"models:/SentimentAnalysis/latest")
3. Feed some new reviews into our model
new_reviews = ["This movie was the best, I loved it.", "this movie was the worst, boring!"]
loaded(new_reviews)
4. Result from the notebook should look like this: 
Applications of Sentiment Analysis
Sentiment analysis has a wide range of applications across various industries:
-
Customer service: By analyzing customer feedback, sentiment analysis can help businesses identify common issues and improve their customer service. It enables companies to respond promptly to negative sentiment and enhance the overall customer experience.
-
Marketing: Sentiment analysis can provide valuable insights into customer opinions and preferences, helping businesses refine their marketing strategies. By understanding what customers like or dislike, companies can create more targeted and effective marketing campaigns.
-
Social media monitoring: Monitoring social media platforms for customer sentiment allows businesses to track trends and patterns in real-time. This can be particularly useful for managing brand reputation and responding to public opinion swiftly.
-
Recommender systems: Incorporating sentiment analysis into recommender systems can enhance their accuracy by considering customer preferences and opinions. This leads to more personalized and relevant recommendations, improving customer satisfaction.
By leveraging sentiment analysis, businesses can gain a deeper understanding of customer sentiment and make more informed decisions, ultimately driving better business outcomes.
Conclusion
In conclusion, the combination of HuggingFace Transformers, Microsoft Fabric, and MLflow creates a powerful framework for building robust sentiment analysis models. These tools not only simplify the process of deploying machine learning models but also offer significant flexibility when managing the entire machine learning lifecycle—from data preparation to model training and deployment.
By following the steps outlined in this guide, you will be able to effectively implement sentiment analysis in your projects, leveraging cutting-edge transformer models and fine-tuning them to suit your specific needs. Although the lack of GPU support in Fabric may slow down training, the platform's secure and scalable infrastructure makes it an excellent choice for running predictions at scale.
With HuggingFace and MLflow, you're well-equipped to explore deeper insights from textual data and make data-driven decisions that align with market trends and customer feedback.
You may be interested in these blogs:
💰 Efficient Cost Management with Copilot for PowerBI: A Complete Guide
📈 Power BI Usage Metrics Across All Workspaces: Step-by-Step
📊 How AI Data Analysis Enhances Analytics: Key Benefits & Top Tools
📓 Installing the ArcGIS Python Module in a Fabric Notebook: Step-by-Step
Next Steps: Explore 'Fabric and Copilot' Recordings
Dive deeper into Microsoft Fabric and uncover the full spectrum of its capabilities. Explore how this powerful platform enables organizations to efficiently manage, analyze, and harness valuable data and insights.

By signing up for the Copilot Virtual Briefing Sessions, you’ll get exclusive access to a treasure trove of information, including the “Fabric and Copilot” recording. Join Scott Sugar as he dives into the details of Fabric, showing how Copilot can transform your data analysis workflows and boost your decision-making. Register now to unlock the full potential of Microsoft Fabric and take your data transformation journey to the next level.
Unleash the Full Potential of Your Data Transformation
Ready to take your data transformation to the next level? ProServeIT can help! As a Microsoft Solutions Partner in Data & AI, our team of certified professionals is here to empower your organization to leverage the full potential of your data.
Contact ProServeIT today and schedule a consultation with our data specialists.
Tags:

September 18, 2024


Comments