Used by over 200,000 organizations around the globe, SharePoint is Microsoft’s powerful and versatile business platform for collaboration and content management. Your organization has purchased Office 365 licences, and now it falls to you, the IT manager, to look into the most efficient ways for your organization to utilize SharePoint. This blog includes three major tips to set up and configure your organization’s SharePoint site.
SharePoint User Guide - Tip #1: SharePoint Team Sites and Subsites - How to Set Them Up
SharePoint Team Sites are designed to connect you and your team to your organization’s content, information and any apps that you rely on. It is the default setting for SharePoint, and it provides your team with the most effective way to collaborate with each other.
Before you get started with creating your team site and subsites, spend some time thinking about how your organization is going to use SharePoint. Ask yourself questions like:
- How much content does your organization have (the more content you have, the harder it is for people to search through)?
- How are your organization’s employees going to search for the information/documents they need?
- Do you need subsites? If so, what subsites do you need? Will you split the subsites up by teams, content, project or customer?
- Do some of your team members deal with highly confidential information that needs to be kept separate from the rest of the organization?
- What kind of content are you going to have on your team site?
Microsoft suggests that you might find it helpful to create a diagram of your site hierarchy to help organize your planning before you start building your site.
Once you’ve planned the content for your SharePoint site, it’s time to set up your team site. Follow these steps below to set up your organization’s team site in SharePoint Online:
Step 1: Log in from the web.
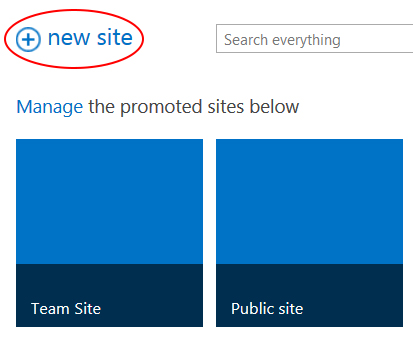
- You’ll see a default Team Site and Public Site already there for you.
Step 2: Click on the “+ New Site” button.

Step 3: Choose a name for your team site.
- You’ll see the secure URL that your site will be located at (note the “https”).
Step 4: Choose your theme for the site.
- Click on “Settings” (gear icon), then select “change the look”. You should see a palette of different colours that you can use.
Step 5: Share your new SharePoint site
- Click on “Settings” (gear icon) and scroll down to “Site Settings”
- Click “People and Groups”
- This is where you can invite people and set the groups that will be using your site.
- Click “Site Permissions”
- This is where you can set up the permissions. Each group will have the same permissions.
ProServeIT has worked with thousands of SharePoint users to help them make the best use of the program for their organization. Based on our experience, we’ve put together this list of 8 tips to consider when designing an effective SharePoint team site.
SharePoint User Guide - Tip #2: How to Create a SharePoint Document Library
SharePoint Team Sites already have a document library included (by default). However, if you’re building out a new Team Site, or you require additional document libraries, you can follow these steps to create your new library.
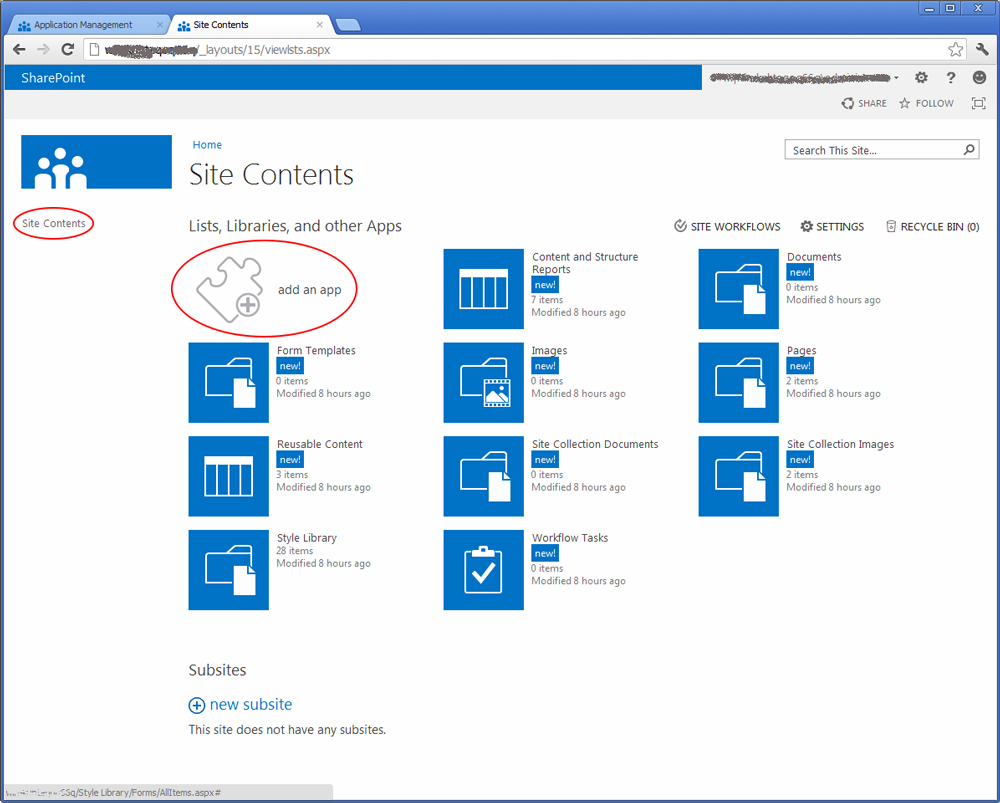
Step 1: From your SharePoint site, click “Settings” (gear icon) and the click “Site Contents”
Step 2: Click “Add an app”

Step 3: Click the library type you want (document, form, picture, etc.)
Step 4: Type a title into the “Name” field
Step 5: Depending on the type of library, you can also add versioning and/or other features. Click “Advanced Options” for more information.
Step 6: Click “Create”.
To see next steps with your document library, check out Microsoft’s support document on creating a document library in SharePoint.
SharePoint User Guide - Tip #3: SharePoint Permissions - How to Control Access?
You’ve set up your SharePoint Team Site, you’ve created your document library… now let’s talk about how you control access to your content by setting your SharePoint permission levels.
It’s best practice, when first starting out, to assign group-level permissions to various members of your organization, rather than setting permissions for each individual within your organization. This is because groups are much easier to manage.
When you create a site, SharePoint automatically creates a pre-defined set of SharePoint groups for that site – you’ll see Owners, Members and Visitors. You can either fine-tune these to set different permissions and permission levels, or, if they don’t work for your organization, you can create a new group altogether.
Let’s suppose that you’d like to create a “Sales” group that will be able to read, edit and contribute to items and documents on your SharePoint site. Using this supposition, follow the steps below to create a new group called “Sales”:
Step 1: On your team site, click on “Settings” (gear icon), then click “Site Settings”.
Step 2: Under “Users and Permissions”, click “Site Permissions”. This will open up the permissions page.
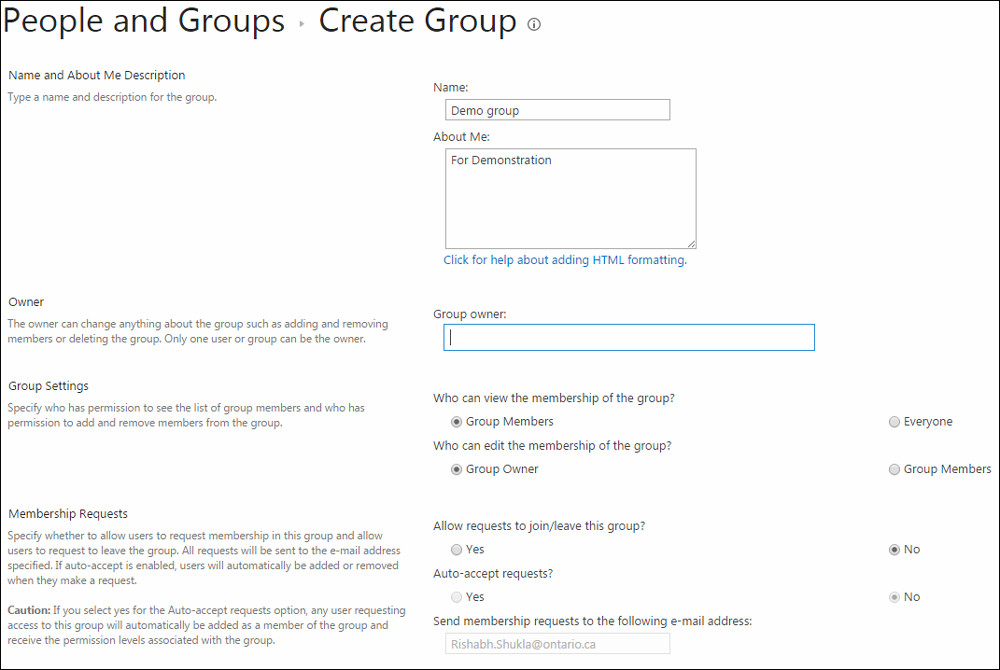
Step 3: Click on the “Permissions” tab, then click “Create Group”.

Step 4: In the “Name” and “About Me” boxes, type “Sales” and a description of the sales group.
Step 5: In the “Group Owner” box, signify who will be managing this group.
Step 6: Set the permissions for the group in “Group Settings”.
Step 7: If you want people to be able to request to join or leave the group, you can set the settings in the “Membership Requests” section.
Step 8: Choose a permission level for the group using the “Give Group Permissions to this Site” section.
Step 9: Click “Create”.
Microsoft has put together a helpful article that walks you through the various permissions and permission levels, and, if you’d like to learn more about creating groups, adding/removing users from groups, etc., we recommend this Microsoft article on customizing SharePoint site permissions.
Designing Your Organization's SharePoint Site? Let Us Help You!
These three tips that we’ve compiled above will get you started on your own SharePoint journey. However, working with a SharePoint expert – someone who does this day in and day out – can help you take advantage of SharePoint much faster, more efficiently, and with greater cost and time savings to your organization. ProServeIT has been assisting customers of all sizes, in all industries with their content management needs by implementing SharePoint in their organizations. Skip the headaches – work with our experts to get started on the right track, so that you can enjoy your well-deserved ROI. Let us help you - drop us a line!
- Learn more about content management:
- Learn about SharePoint in more detail: Microsoft SharePoint
Tags:
October 03, 2017
Comments